The
Information On This Page Has Four Main Objectives:
1) How to determine if you have sufficient space for a dart
throw area.
2) How to properly hang a dartboard.
3) How to set-up an attractive throw area with sufficient
lighting on the dartboard.
4) How to do this as as cost efficiently as possible.
We at DT are always happy to answer questions from either a bar
owner or an individual about setting up a dartboard. Although
the consideration here is geared more toward Thailand bars and
pubs which tend to be much smaller than in the West - all this
information is applicable anywhere. Veteran dart players as well
as pub owners who've been in the game a while know all this as
common knowledge. But to someone who has never set up a
dartboard there is a lot more to consider than just the
instructions included with your dartboard on how to hang it on
the wall at the required proper measurements. We hope that you
find this information useful and successfully add a dartboard to
your establishment.
The graphic (to scale) - right - of Ned's darts setup with
customized light box is from The Silver Dollar Bar. Most of the
photos of this throw area in the gallery accompanying this
segment are also from The Silver Dollar Bar. So then, the Silver
Dollar is a really popular & happening Bangkok darts bar? Yes -
it was. Was? Yes, sadly the Silver along with seven other dart
bars in Washington Square no longer exist. The Square in now
flattened eventually to become yet another empty Bangkok mega
shopping mall.
The
first thing to consider - Do you have sufficient space for a
dartboard throw area? Obviously the dartboard itself takes
little space - hangs on the wall like a picture. And in some
places - without sufficient throw area space - their dartboard
in nothing more than a decoration - seldom if ever used. Cheap
kiddie dartboards are a far cheaper wall decoration than a real
dartboard. So how much space do you need for a proper throw
area? A floor space area ten feet from the dartboard wall that
is six feet wide. What - that much? Well consider that the
player standing at the oche or throw line is 7' 9 1/4'' from the
front of the dartboard needing an unobstructed space in which to
throw as well as an unobstructed sight view of the dartboard.
The top view illustration - left - shows the needed space.
Another consideration especially relevant some places here in
Thailand is a high enough ceiling. Many pubs are in shop houses
and double wide shop houses with really high ceilings but
renovate these into two floors to maximum their capacity. The
ceiling height in these areas are then less than standard
height. A dart throw area should have a minimum ceiling height
of at least eight foot. Remember a dart thrown at the board has
a high arch some players with a really high arch. And a person
six foot tall can stretch to reach an eight foot high ceiling.
Best Spot for a
Dart Throw Area in the Bar - "Out of Sight - Out of Mind" can
best describe a dartboard outside the area where most people
congregate in a bar. The same principle goes for a pool table or
any other popular pub game. A dartboard in a separate room or
one floor up may be okay for league play or tournaments but will
not attract anywhere near as many
regular, every day players -
and most especially new
players
- as a dartboard within sight of the popular congregating spot
in the bar. You may have no choice but if you do - placing your
dart throw area in the correct location in your bar could be the
difference of just having a dartboard or becoming a popular dart
bar. One more point to consider is fan and air-condition breeze.
If breeze is a factor in golf - just think how much more a
factor with darts - having a flight or feathers section. Your
dart throw area needs to be out of any breeze area.
If you have
any doubt about this - try pointing a fan in the direction of
the dart throw area and then try throwing some darts. Not only
will you be convinced but may be amazed at just how much a
slight breeze can totally alter the trajectory of a dart.
Coming close
when shooting may be acceptable to some but coming close when
hanging a board is not acceptable to any player. Follow the
instructions and get it spot-on the first time. A new dartboard will come with the necessary hardware to hang it
and instructions as seen
in the diagram left. A dartboard must
be hung properly - correct measurement from the center of the
bullseye to the floor with the oche or throw line at proper
distance and have sufficient lighting. A dartboard will come
with a bracket to be affixed to the wall or your back board - a
set-screw to go in the center of the dartboard - on back in the
pre-drilled hole - and three bumpers compensating for the
set-screw.
REMEMBER - the 7' 9 1/4" oche measurement is NOT FROM THE WALL
but from the front of the board. Using both this measurement and
the diagonal 9' 7 1/2" measurement from the center of the
bullseye to the oche will insure that you get it right.
The
first step is affixing the dartboard bracket. Insure that your
pencil mark on the wall or backboard is 5' 8" from the floor.
The set-screw in the back of the dartboard is then fitted into
the slot of the bracket. The reason for this style bracket is so
that the dartboard can be regularly rotated for even wear.
Regularly rotating the dartboard is most important especially in
bars where the patrons play a lot of 501 as the triple 20 area
will be thrown at much more than other areas. Rotating the
dartboard on a regular basis can easily double or triple its
lifespan. Just how often depends on the amount of play on the
dartboard. In my regular darts pub with a good amount of play
it's rotated once a week.
A footnote to nubiles - the
numbers "ring" snaps on and off when you rotate the dartboard.
Now as all new dartboards come with a perfectly
functional bracket and hardware to hold the dartboard
exactly in the manner it was designed to do - why then
would I want to even consider spending additional money
for a dartboard clamp? Seems a logical enough
assumption but in the long run the clamp will actually
save you money and avoid increasing levels of
annoyance and irritation. Trying to find the slot in the
bracket while holding a dartboard with the set-screw in the back
can be a real sobriety test. Additionally the more you do this
the more wear and tear on the bracket. The bracket is fairly
light gauge and will begin to loose shape and bend out. You
can't keep replacing it with the cheaper brackets as the screw
holes will also wear. Done right from the get-go with a
dartboard clamp will avoid all this. There are different
dartboard clamps on the market but the one above is the one I
personally prefer.
A Dartboard
must have sufficient lighting - defined as no shadows cast from
a dart thrown in the board. Using conventional lighting
this can be a real challenge as two spotlights properly
positioned are usually needed to get it right. And getting the
lighting right is an on-going nightmare for some venues.
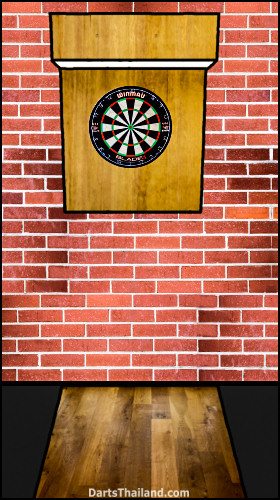
Ned's
backboard and light hood is spot on and with only one florescent
bulb in the hood. This has to be the cheapest set-up to make as
well as being the most efficient.
The trick of why this works is the depth of the hood. Many
put up a hood far too shallow that then causes shadows.
Ned's design has a hood 13 1/2'' deep. The inside is painted
white and the florescent bulb fixture is mounted to the far
front of the hood - dispersing the light over the board with
no shadows on darts in the board.
The inside of the hood has room for mirrors to further
intensify the light if needed of even additional spot lights. The outside hood and backboard can be stained or painted any
color to best suit your bar. Also the outside front of the hood
is a great place for your bar's name. This is the basic design -
functional - easy to construct as well as inexpensive. How fancy
you make it look is up to your own creativity.
Lastly - the
throw lane area & the oche or throw line. Ideally a raised oche
is the preferred standard. Although this is not always possible
- here's an idea to consider. As seen in the first diagram and
in the below photo gallery - Ned used a 3/8' thick section of
plywood affixed to the floor to cover both the throw lane and
serve as a raised oche that you could toe up against.
Surprisingly few if any tripped on it and that's saying a lot
considering the clientele the Silver Dollar Bar had. Most
commonly used for the throw lane area is either a mat or carpet
and again minimum or two foot in width (no maximum on the
width).
This could come right up to the oche line and serve as
the oche or go beyond the oche line - where the player stands
and the also serves as a visual aid to people where not to stand
when a player is throwing. And again - although a line to mark
the oche is sufficient - a raised oche is preferred. Is a
throw lane mat absolutely necessary? Depends on your floor - if
it's wood or carpeted - no only a oche is. But if you have a
hard surface floor such as tile or concrete - yes a floor mat is
most definitely necessary - and the more area it covers - the
better.
So why is the surface of the floor area below the
board so critical? Quality darts today have a hard metal barrel
(body) using metals like tungsten for more weight and a thinner
dart. Although strong they are also brittle and if they drop or
bounce out of the board and hit a floor surface like tile or
concrete in just the right way - they can shatter. Additionally
have as sharpening stone available as players will be happy to
use it when they get a burr on their dart tip. Stones are cheap
and removing burrs from dart tips will prolong the lifespan of
your dartboard.
Hope you feel
that this page has met its objectives in proving you the
necessary information to determine if you have enough space for
a dartboard throw area - how to hang a dartboard - how to set up
a throw area and last but not least how to do all this at
minimum expense. For some photos of Ned's setup have a look on
the gallery above and large size printable diagrams used in this
article are available below. - - Johnny -
DartsThailand.com